Redirecting traffic with dnsRedir.py
05 Sep 2013 - Tim Newsham
Often while performing network protocol testing, we want to be able to redirect traffic going to a legitimate server to a server of our own. If the program in question is on the local machine and uses standard name resolution, it’s quite simple to edit the /etc/hosts file. However, this is not always the case. In these situations, it’s convenient to have a DNS server that provides an intentionally incorrect answer to DNS lookups. Setting up a DNS server can be a pain, and then there’s the matter of wanting to allow most queries to complete normally without interference.
DnsRedir is a small tool built to address this need. It implements a small DNS server in Python that can answer a select few queries with intentionally false data while proxying all other queries through to a real DNS server. It is implemented to be small and easy to carry around. It should work fine in Windows, Linux and OS X, and its only depedency is that a recent version of Python 2.* be installed.
See the Github repository page for documentation and to download the tool.
Blackbox iOS App Analysis with Introspy
21 Aug 2013 - Tom Daniels & Alban Diquet
In 2013, assessing the security of iOS applications still involves a lot of manual, time-consuming tasks - especially when performing a black-box assessment. Without access to source code, a comprehensive review of these applications currently requires in-depth knowledge of various APIs and binary
formats, as well as the ability to use relatively complex, rather generic tools such as Cycript, Mobile Substrate, or a debugger.
Introspy
To simplify this process, we are releasing Introspy - an open-source application profiler for iOS. Introspy is designed to help penetration testers understand how an application functions at runtime by swizzling system APIs to gather detailed information on each of the calls that can then be analyzed offline.
The tool comprises two separate components: the injected dylib that performs the swizzling and traces calls to the system APIs, and an offline analysis tool for mining the traced calls. The iOS tracer can be easily installed on a jailbroken iOS device and configured via the main Settings application. The tracer hooks security-sensitive APIs called by a given application and records the calls in a database. These include function calls related to cryptography, IPC, data storage / protection, networking, and user privacy. The full list of traced calls can be found on the project wiki. The introspy analyzer can then extract the database of traced calls off of the device and generate an HTML report displaying all recorded calls, plus a list of potential vulnerabilities affecting the application. Additionally, there are a myriad of options to allow quick and dirty analysis from the command-line.
Project page
We have been using this tool internally with much success for a period of time and have decided to share it with the community with the hope that it will lead to better black-box security analysis and ultimately more secure iOS applications. For a quick overview read our GitHub page or checkout the GitHub repository for full details on how to install and configure the tool.
Man-in-the-Middling Non-Proxy Aware Wi-Fi Devices with a Pineapple
21 Aug 2013 - Anson Gomes
Every security professional has to Man-in-the-Middle (MitM) network
communication at some point in their career. This can be challenging in
situations where the device or application does not allow the user to specify
a proxy server. The only way to monitor this sort of communication is to
intercept the traffic flowing through the device’s Internet connection, most
commonly a wireless Access Point (AP). Getting this setup working correctly
can be difficult, as it depends on a number of factors, including having the
right hardware and properly configured software. There are various blog posts
which demonstrate how to create an AP and set up a DHCP server, but few go
into the nitty-gritty details of the entire process for middling network
communication.
This blog article details the steps I took to create this setup in order to
perform MiTM analysis on a custom black-box device. For my setup, I used
Ubuntu and the Wi-Fi
Pineapple.
What is the Wi-Fi Pineapple?
You can think of the Pineapple as a highly configurable router. It sets up a
wireless AP and a DHCP server. My reasons for choosing the Pineapple were for
its compatible hardware and easy to use software configurations; both of which
are necessary for setting up a working AP. The Pineapple is built using the
Atheros
AR9331
chipset supporting Master
mode and uses
OpenWRT for setting up the 802.11 b/g/n wireless
router. Out of the box, the Pineapple has a number of tools which help in
wireless security testing and penetrations tests such as
Karma,
DNSSpoof, and
URLSnarf among others. All of these are
controlled via a web application which is accessible on the Pineapple. These
tools and features can also be accessed via SSH. The current version is Mark
IV and is sold for only $99.99, so the Pineapple is a cheap and easy to use
device for wireless assessments.
How to Man-in-the-Middle Communication using a Pineapple
Now that you know what the Pineapple is, we’ll look at how to use it to MiTM
network traffic.
The diagram below represents my setup to MitM network traffic between a device
and a server on the Internet which can be understood as:
- The testing laptop is connected to the Internet via the Ethernet port.
- The testing laptop is also connected to the Pineapple via the Wi-Fi
adapter.
- The target device is configured to talk to the Pineapple.
- All monitoring and interception happens on the testing laptop.
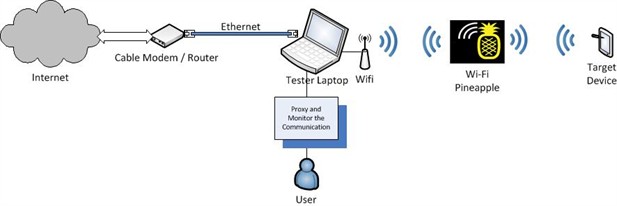
Note: You can modify this setup to suit your needs, e.g. connect the Pineapple
to the laptop via the Ethernet port and connect the laptop to the Internet via
Wi-Fi.
Step 1: Setting up the AP and DHCP service
Since the Pineapple sets up an AP and a DHCP server out of the box, our task
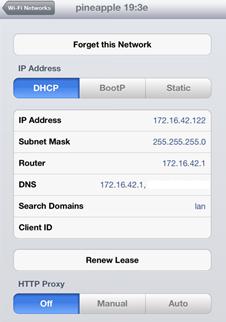
of setting up a working AP is handled by the Pineapple itself. The default AP
created by the Pineapple is called pineapple 19:3e. It also has an IP
address of 172.16.42.1 and leases IP addresses in the range of 172.16.42.0/25.
The adjacent screenshot of an iPad (used for demonstration) connected to the
Pineapple depicts this information. You can change these settings by SSHing
into the Pineapple and by modifying its configurations.
You can now connect a device to the AP created by the Pineapple; however, the
device will not be able to connect to the Internet because we haven’t
connected the Pineapple to the Internet. To do that, we’ll need to set up
Internet Connection Sharing (ICS) on our laptop by forwarding all traffic from
the Pineapple’s Wi-Fi adapter to its Ethernet adapter (or vice versa depending
on your setup). Then, we’ll be able to monitor and intercept the traffic
flowing through the Pineapple.
Step 2: Configuring the Pineapple to connect to the Internet (Setting up ICS)
We can set up ICS with a bit of networking and
IPTables magic. Enabling ICS
between the two physical interfaces (i.e. Ethernet and Wi-Fi adapter on the
tester’s laptop) involves the following steps:
-
Enabling IP Forwarding.
-
Creating a route between the interfaces for forwarding the network traffic.
-
Routing network traffic between the interfaces through a proxy via IPTables.
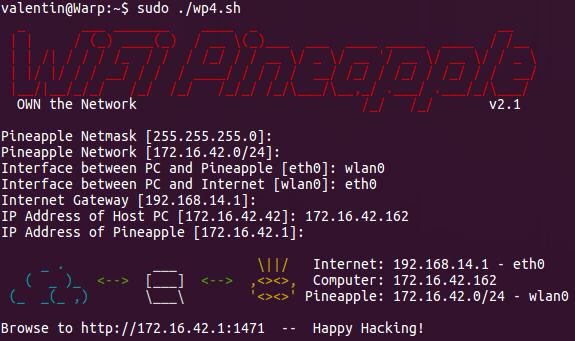
This task of setting up ICS is again made easy by the Pineapple. There is a
script called wp4.sh available
from the Pineapple website which sets up the ICS between the interfaces. A
full list of commands is available towards the end of the article which
includes the commands from the wp4.sh script in addition to a few others to
MiTM network traffic. For the wp4.sh script to execute successfully, you will
need some knowledge of the network configuration of your system. You can get
this information by running ifconfig on the laptop. Download the script from
the website and execute it inputting the necessary configuration so that it
executes successfully as seen in the screenshot below.
Once you have ICS configured, the device connected to the Pineapple will be
able to access the Internet. As mentioned earlier, the Pineapple comes with a
plethora of tools which can be managed via a web interface. This web interface
also lists all the devices that are connected to it and also has a logging
functionality which can be really useful.

You can also monitor the traffic flowing through the Pineapple using packet
capture software such as Wireshark by sniffing on
the Wi-Fi adapter of the laptop.
Now that you can monitor the network traffic flowing through the Pineapple,
let’s look at how to send this traffic to a proxy server so that we can
actively modify the data flowing across the wire.
Step 3: Routing network traffic through a proxy server via IPTables
If we were using a device such as an iPad for MitM communication this would
have been easy; just add a proxy server to the network settings of the device
and you would be in the middle of the network communication. However, since we
cannot modify or set the proxy settings on a non-proxy aware device our task
is a little more complicated. We can use IPTables rules to MitM the network
communication flowing from such a device through the Pineapple. The following
IPTables rules will redirect all traffic for ports 80 and 443 to port 8080.
iptables -t nat -I PREROUTING -p tcp --dport 80 -j REDIRECT --to-ports 8080

iptables -t nat -I OUTPUT -p tcp -d 127.0.0.1 --dport 80 -j REDIRECT --to-ports 8080

iptables -t nat -I PREROUTING -p tcp --dport 443 -j REDIRECT --to-ports 8080

iptables -t nat -I OUTPUT -p tcp -d 127.0.0.1 --dport 443 -j REDIRECT --to-ports 8080
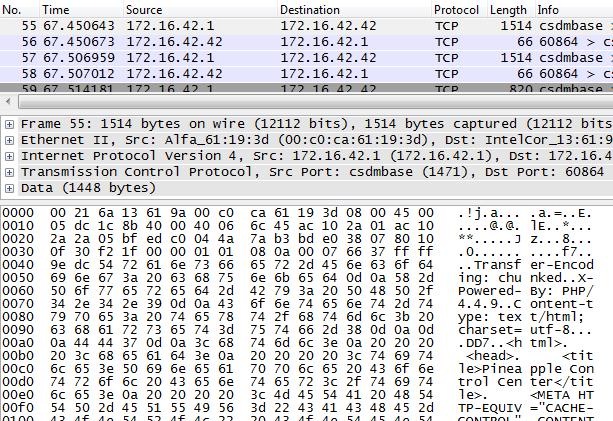
We can now have a proxy server running on the loopback (127.0.0.1) interface
of the laptop and intercept traffic on port 8080. Using this setup we can make
changes to the network traffic on the fly as shown in the screenshot below
(where the iPad is used just for demonstration):

Note:Intercepting SSL traffic from the embedded device could be a little
tricky and difficult based on the security configuration of the device. You
will have to install a SSL certificate (from the proxy server) into the
trusted root store of the device. This procedure will be device specific.
The example above redirects HTTP. If you’re not sure what the device is
talking, using the packet capture software to determine the ports, and
redirect the correct ones. Make sure that the proxy server can handle the
protocol used by the device; Burp is
an HTTP proxy whereas
Canape,
Mallory and
tcpprox can intercept raw TCP
communication.
Conclusion
It’s much easier to MitM the network communication of opaque devices than it
may seem.
The complete list of commands to MitM network traffic using the Pineapple is
listed below. These commands have been taken from the wp4.sh script of the
Pineapple and include the additional IPTables rules for proxying the network
communication on ports 80 and 443 by redirecting it to port 8080. Replace the
variables with your setup’s configuration data.
#Setup the Configurations

pineapplenetmask=255.255.255.0 # Default netmask for /24 network

pineapplenet=172.16.42.0/24 # Pineapple network. Default is 172.16.42.0/24

pineapplelan=XXX    # Interface of Ethernet cable connected to the laptop

pineapplewan=XXX    # Interface of the Pineapple connected to the laptop

pineapplegw=XXX     # The IP of the Internet Gateway

pineapplehostip=XXX #IP Address of host computer

pineappleip=172.16.42.1 # IP Address of the pineapple


#Bring up Ethernet Interface directly connected to Pineapple

ifconfig $pineapplelan $pineapplehostip netmask $pineapplenetmask up


#Enable IP Forwarding

echo '1' > /proc/sys/net/ipv4/ip_forward


#Clear the IPTables Chains and Rules

iptables -X

iptables -F


#Setup IP Forwarding

iptables -A FORWARD -i $pineapplewan -o $pineapplelan -s $pineapplenet -m state --state NEW -j ACCEPT

iptables -A FORWARD -m state --state ESTABLISHED,RELATED -j ACCEPT

iptables -A POSTROUTING -t nat -j MASQUERADE


#Remove the Default Route

route del default


#Add a new Default Gateway

route add default gw $pineapplegw $pineapplewan


#Modify the IPTables to enable proxying

iptables -t nat -I PREROUTING -p tcp --dport 80 -j REDIRECT --to-ports 8080

iptables -t nat -I OUTPUT -p tcp -d 127.0.0.1 --dport 80 -j REDIRECT --to-ports 8080

iptables -t nat -I PREROUTING -p tcp --dport 443 -j REDIRECT --to-ports 8080

iptables -t nat -I OUTPUT -p tcp -d 127.0.0.1 --dport 443 -j REDIRECT --to-ports 8080
Troy Hunt has a nice blog
article
on his site which shows you how to MitM network communication using the
Pineapple and Windows.
Now that you know how to MitM network traffic, Happy Hacking!
P.S.: If you want to learn more about testing back-box embedded devices come
watch our Turbo
Talk at Black Hat
where Jonathan Chittenden and I will be talking about how we went about
testing Twine. The presentation will give
insight into performing black-box analysis of an embedded system - for fun,
for research, or for profit. You will have a better understanding of where
things can go wrong, how to fix them and how to proceed from there. Further,
individuals charged with designing and building similar devices will
understand how to design such devices with better security. The presentation
will contain information that will be beneficial to designers, builders,
breakers, defenders and users alike.
iOS SSL Kill Switch v0.5 Released
20 Aug 2013 - Alban Diquet
Version 0.5 of the iOS SSL Kill Switch is now available.
iOS SSL Kill Switch is a tool to disable SSL certificate validation -
including certificate pinning - within iOS Apps in order to facilitate
blackbox testing.
The main goal for this version was to add the ability to disable
certification within the iTunes App Store app. While working on
this feature, I discovered a new way to disable certificate validation that
worked on many more applications than previous versions of the tweak.
As a consequence, version 0.5 of the SSL Kill Switch is a complete rewrite.
The debian package is available here and was tested on iOS 6.1.
Instructions on how to install it are available on the project page.
How it works
Just like the previous versions of the tool, the SSL Kill Switch uses MobileSubstrate
to patch system functions. However, this new version of the tweak hooks
functions within the Secure Transport API instead of
hooking NSURLConnection methods and SecTrustEvaluate().
The Secure Transport API is “the lowest-level TLS implementation on iOS”
which makes it an interesting target because other higher level APIs such as
NSURLConnection internally rely on the Secure Transport API for their
certificate validation routines. This means that disabling SSL certificate
validation in the Secure Transport API should affect most (if not all) of the
network APIs available within the iOS framework.
According to the documentation, disabling or performing
custom certificate validation is implemented the following way when using the
Secure Transport API:
- Before starting the connection, call SSLSetSessionOption() to set the kSSLSessionOptionBreakOnServerAuth option to “true” on the SSL context. Setting this option to “true” disables the framework’s built-in certificate validation to let the application perform its own certificate verification.
- Run the Secure Transport handshake as per usual using the SSLHandshake() function.
- When SSLHandshake() returns errSSLServerAuthCompleted, call SSLCopyPeerTrust() to get a trust object for the connection and use that trust object to implement whatever custom server trust evaluation you desire.
- Either continue the Secure Transport handshake by calling SSLHandshake() again, or shut down the connection.
The SSL Kill Switch removes the ability to do any kind of certificate
validation by hooking and modifying three functions within the Secure
Transport API.
Patch SSLCreateContext(): Disable the built-in certificate validation in all SSL contexts
SSLCreateContext() is used to create a new SSL context. SSL Kill Switch modifies this function
so that all new SSL contexts have the kSSLSessionOptionBreakOnServerAuth set to true
by default:
static SSLContextRef replaced_SSLCreateContext (
   CFAllocatorRef alloc,
   SSLProtocolSide protocolSide,
   SSLConnectionType connectionType
) {
    SSLContextRef sslContext = original_SSLCreateContext(alloc, protocolSide, connectionType);

    // Immediately set the kSSLSessionOptionBreakOnServerAuth option in order to disable cert validation
    original_SSLSetSessionOption(sslContext, kSSLSessionOptionBreakOnServerAuth, true);
    return sslContext;
}
Patch SSLSetSessionOption(): Remove the ability to re-enable the built-in certificate validation
SSLSetSessionOption() can be called to set the value of specific options on a given SSL context. The tweak
patches this function in order to prevent the kSSLSessionOptionBreakOnServerAuth from being set to any value.
The goal here is to ensure that all SSL contexts keep the default value of “true” for the
kSSLSessionOptionBreakOnServerAuth option (as set in the previous section):
static OSStatus replaced_SSLSetSessionOption(
    SSLContextRef context,
    SSLSessionOption option,
    Boolean value
 ) {
    // Remove the ability to modify the value of the kSSLSessionOptionBreakOnServerAuth option
    if (option == kSSLSessionOptionBreakOnServerAuth)
        return noErr;
    else
        return original_SSLSetSessionOption(context, option, value);
}
Patch SSLHandshake(): Force a trust-all custom certificate validation
Lastly, SSLHandshake() is modified in order to prevent this function from ever returning
errSSLServerAuthCompleted, which is the return value that will trigger the caller’s certificate
checking/pinning code:
static OSStatus replaced_SSLHandshake(
    SSLContextRef context
) {
    OSStatus result = original_SSLHandshake(context);

    // Hijack the flow when breaking on server authentication
    if (result == errSSLServerAuthCompleted) {
        // Do not check the cert and call SSLHandshake() again
        return original_SSLHandshake(context);
    }
    else
        return result;
}
That’s it ! After patching those three functions, certificate validation was disabled in all
the applications that I tried including Safari, Twitter, Square as well as the iTune App
Store (with a few additional steps).
Project page
Have a look at the full code by browsing to the project page on GitHub.
Black Hat 2013 - Femtocell Presentation Slides, Videos and App
19 Aug 2013 - Tom Ritter
We’re back from Las Vegas, rested, and finally ready to release the slides, videos, and our app from our presentation at Black Hat and Defcon: Traffic Interception and Remote Mobile Phone Cloning with a Compromised CDMA Femtocell.
Slides and videos
The slides are available here. The videos of our demos are up on Youtube:
An Android app to detect femtocells
The CDMA Femtocells we examined differ from other types of personal wireless access points because the user does not have a choice in whether or not they connect to a femtocell. Because your phone doesn’t give you a choice when it comes to selecting what tower to connect to, the only way we could find to avoid communicating through a femtocell was to turn off the phone’s cellular radio when it was connected to a femtocell.
Our FemtoCatcher Android app is now available on the Google Play Store, with source code available on GitHub.
FemtoCatcher runs on your Verizon Android smartphone and automatically switches your device into Airplane Mode, thus disabling all cellular connectivity, if it detects that your phone has connected to a femtocell. While this does render your cellular connectivity unavailable in areas where the strongest signal is a femtocell, we would rather have no service than be connected to a tower that could be used by an attacker to intercept our communications.
Some important notes on how FemtoCatcher works:
- FemtoCatcher uses the network ID information available through Android API calls to determine if the phone is connected to a Femtocell.
- We did not test how easy it would be for an attacker to change this information to fool the app, but certainly don’t rule out the possibility.
- Some Verizon Android phones display an icon in the status bar and/or display an ERI banner of “Network Extender” when connected to a femtocell. The strategy used by FemtoCatcher to detect the presence of a femtocell is based on the same techniques used by these indicators in Verizon ROMs.
- FemtoCatcher will not automatically take your phone out of airplane mode when you move away from a femtocell. You will be without service until you manually re-enable your connectivity. If FemtoCatcher is running and you are in range of a femtocell when you disable airplane mode, FemtoCatcher will quickly put your phone back in airplane mode.
Because of its imperfect and potentially confusing nature, we are not marketing FemtoCatcher to the general public, but rather to security minded people and those that are interested in femtocells. We built this tool for our own testing, but we encourage you to poke at the source code and use it as you see fit.